-
Getting started
-
RVsitebuilder App
-
RVsitebuilder App Development
-
Frontend Development
-
RVsitebuilder Visual Editor (WYSIWYG)
-
Internationalization
-
Contributing to Documentation
-
Admin UI and Example UI
App Configuration
- Config
- Register Config on App's Service Provider
- Access App's Configuration
- Config Admin Interface
- Event Open Admin Interface
- Get Custom Values on your config file
- Config Form Request Validation
{info} If you are not familiar with its concept. Check out the full Laravel Configuration documentation to get started.
Config
Create Laravel config.php file and keep it in your app’s /config folder.
/packages/vendor-name/project-name/
                    ├── config
Example of config.php
use Rvsitebuilder\Core\Facades\RvsitebuilderService;
    return [
        'key' => 'value'
    ];
Register Config on App's Service Provider
On your app's service provider, load your config under register method.
public function register()
{
    $this->mergeConfigFrom(__DIR__.'/../config/config.php', 'vendor-name/project-name');
}
{warning} At this state, Laravel still not bind all services. You are still not able to access database, do not call it on config.php.
Access App's Configuration
The configuration values may be accessed using "dot" syntax, which includes the vendor-name/project-name declared on mergeConfigFrom and the key on the your config.php.
config('vendor-name/project-name.key');Config Admin Interface
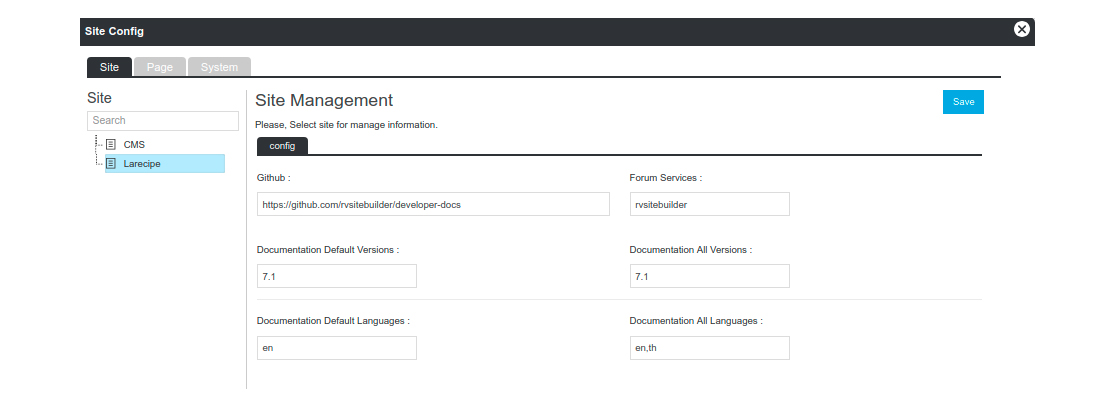
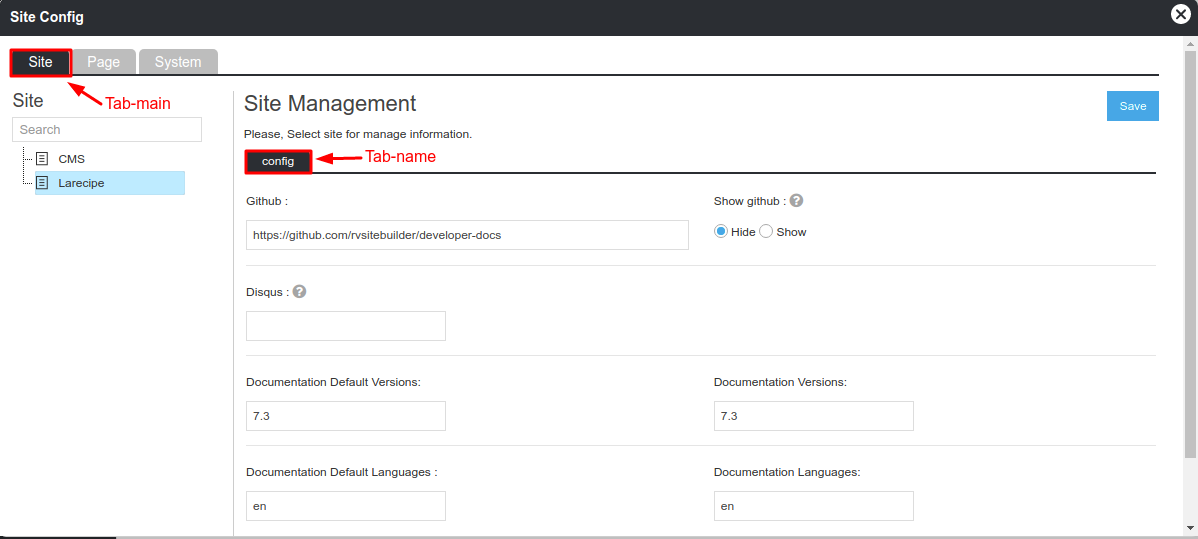
RVsitebuilder comes with the unified config admin interface on the admin manage app. Go to apps launcher choose manage, and choose config on the left menu.
To allow end-users change the value of your config online, you need to create a config blade file. And define it on your app’s service provider.
public function boot()
{
    $this->defineConfigInterface();
}

protected function defineConfigInterface()
{
    // app('rvsitebuilderService')->siteConfigInterface('tab-name','app-name::blade-file-path');
    app('rvsitebuilderService')->siteConfigInterface('config','vendor-name/project-name::admin.config');
}
If you have a large configuration file, you may display it as multiple tabs by creating several config blade files, and call siteConfigInterface with different tab-name.
Here is an example of config blade file:
<label>Github : </label>
<div class="">
  <input
    type="text"
    name="key"
    value="config('vendor-name/project-name.key')"
  />
</div>
key must exist on your app’s config.php otherwise it will not be allowed to save.
Saving config on Config Admin Interface will store values to database on core_setting table. There is an event/listener to rebuilt custom config to /storage/dbconfig.json. This will allow you continue to load config on the register method and safely run artisan config:cache if you wish.
If you modify config on table core_setting directly, you need to remove /storage/dbconfig.json. It will be re-generated automatcially.
Event Open Admin Interface
If your open site config on your app's,and call openConfig with tab-main app-name and tab-name
Here is an example on your app's:
//openConfig('tab-main','app-name','tab-name')
<a onclick="openConfig('site','rvsitebuilder/larecipe','tab-name')">
  Open Site Config</a
>
tab-main you can choose site just one.
app-name the name of the project. It consists of vendor name and project name.If you are not familiar with its app-name Check out the full App Information to get started.
tab-name your define it on app’s service provider call siteConfigInterface with tab-name
Get Custom Values on your config file
Use RvsitebuilderService::getConfig to get the custom config values from /storage/dbconfig.json and fallback to the default value on your app's config.php.
return
[
    'key' = RvsitebuilderService::getConfig('vendor-name/project-name.key', 'defaultValue')
]
Config Form Request Validation
Saving config on Config Admin Interface will always go to RVsitebuilder's config controller. However, you can validate the input end-user made by creating ConfigFormRequest.php.
/packages/vendor-name/project-name/
                    ├── config
                    ├── database
                    ├── routes
                    ├── public
                    ├── resources
                    ├── src
                    │   ├── AppServiceProvider.php
                    │   ├── Http
                    │   │   ├── Controllers
                    │   │   └── Requests
                    │   │   │   └── Admin
                    │   │   │       └── ConfigFormRequest.php
                    │   │   └── Middelware
And define it on your app’s service provider.
protected function defineConfigInterface()
{
    app('rvsitebuilderService')->configRequestValidation('ConfigFormRequest');
}
Here is an example of config form request validation file:
public function rules()
{
    return [
            'key' => 'required'
    ]
}